Lifting the ball and prepping your surface
Dust your work surface — or the pizza peel directly, if you'd rather skip an extra transfer step — with flour or semolina. Semolina's coarser grains grip the dough less than fine flour and shake off more easily when you launch the pizza.
Lift the ball carefully out of its container, without pulling or squeezing it, and set it on your prepared surface. If one side clearly carries more flour (typically whichever side sat at the bottom of the container), place that side down, so the stickier top side stays up where it's easier to grip with your fingers.
Press the centre, leave the rim alone
This is the single most important rule for stretching dough: don't flatten the rim. That's where fermentation gas has concentrated, and it's what gives the crust its characteristic light, puffy edge once baked — flatten that area and the gas escapes, leaving the rim flat instead of risen.
Instead, start with the fingertips of both hands in the centre of the ball and press evenly outward, leaving a rim of about half an inch (1–2 cm) completely untouched. Work with the flat pads of your fingers, not your fingertips or nails, so you don't leave dents or small holes.
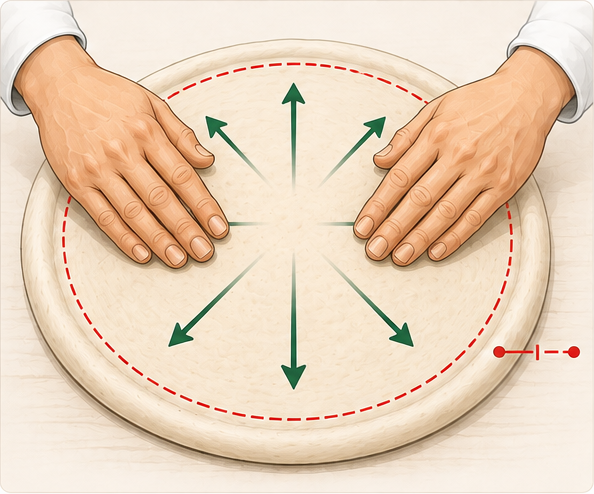
Moving air toward the rim
Repeat the inside-to-outside pressing motion several times, always with gentle, even pressure rather than jerky pushes. Each pass thins the centre a little more, while the air in the dough increasingly shifts toward the untouched rim and visibly puffs it up. Rotate the dough as you go, so the motion reaches evenly all the way around instead of concentrating in one spot.
Growing it: fingers, knuckles, or on the surface
Once the dough gets bigger and easier to handle, you've got a few equally valid ways to keep growing it — which one suits you best is largely a matter of practice and preference:
- Keep working on the surface: press outward from the centre with both hands and rotate the dough regularly. The easiest, most controllable option for most beginners.
- Drape it over your knuckles: lay the dough over the lightly curled knuckles of both hands and slowly move them apart, letting the dough's own weight stretch it downward. Gives you a good view of thin or uneven spots, but takes some practice to avoid tearing.
- Let it move hand to hand (gravity method): hold the dough loosely at the edges like a steering wheel and pass it from hand to hand, letting its own weight do the stretching. Best left to more experienced bakers — not a requirement for a good result.
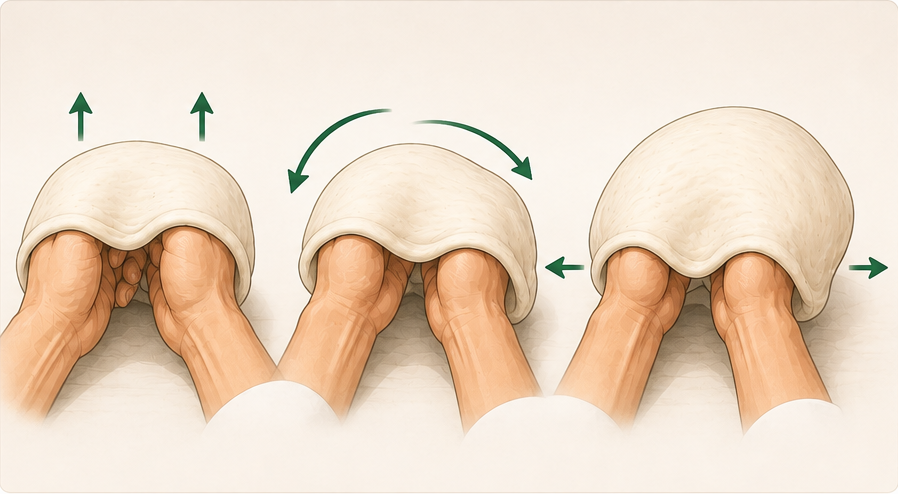
None of these techniques is a prerequisite for a great pizza — show techniques like tossing the dough in the air are irrelevant to how it bakes and are purely visual flair. Dough shaped cleanly and evenly on the work surface works just as well.
When to stop?
Stop once the dough has reached the size that fits your peel, stone, or pan — with a little rim to safely handle it, not stretched right to the limit. A good rule of thumb: better to leave it a little smaller and evenly thick than to keep pulling and risk a centre that's gone too thin, or torn.
Hold the dough up to a light source and you'll often spot noticeably thinner, almost translucent patches well before they actually tear — a good moment to go easy on that spot and work elsewhere instead.
Common stretching mistakes
Avoiding and fixing holes
- Likely cause
- An already-thin spot was stretched further, or a fingernail or hard edge nicked the dough.
- Likely fix
- Prevent it: spot thin patches early and go easy on them, work with the flat pads of your fingers rather than the tips. Fix it: lay the dough flat, overlap the edges of the hole slightly, and press them gently together — then avoid stretching that spot further.
Sticky dough
- Likely cause
- Not enough flour or semolina on the surface, or hydration that's high for the flour you're using.
- Likely fix
- Flour the surface and your hands sparingly but adequately. Full diagnosis: Pizza Dough Too Sticky?.
Dough keeps springing back
- Likely cause
- The gluten network is still tense, usually from too little rest since shaping, or dough that's too cold.
- Likely fix
- Let the dough rest a few minutes and try again. In detail: Pizza Dough Too Elastic.
Uneven centre — thin in one spot, thick in another
- Likely cause
- Not rotating enough while pressing, so the pressure landed unevenly on the dough.
- Likely fix
- Turn the dough a bit after every pressing motion, consistently. Full diagnosis for uneven shape: Pizza Dough Won't Stretch Round.
Rim is flat instead of puffy
- Likely cause
- The outer rim got pressed by accident while stretching, or a rolling pin was used over the whole surface.
- Likely fix
- Next time, deliberately leave about half an inch of rim untouched, and skip the rolling pin.
Transfer to the pizza peel
The easiest option is to work directly on a floured or semolina-dusted peel from the start — then this step disappears entirely. If you shaped the dough on the work surface, slide both palms flat underneath the centre (don't just grab the rim) and move it quickly onto the prepared peel.
Right after, check that the dough still moves freely on the peel (a gentle shake) — if it's sticking anywhere, add a little more flour or semolina immediately rather than discovering the problem after topping it. More on this: Pizza Sticking to the Peel?.
Typical beginner mistakes at a glance
- Pulling too abruptly instead of working with steady, gentle pressure.
- Pressing the rim along with everything else, instead of consistently leaving it alone.
- Not rotating, which leaves the dough uneven.
- Continuing to work an already-thin spot instead of easing off it.
- Not enough flour or semolina on the surface or peel, so the finished dough sticks later.
- Trying to stretch cold dough straight from the fridge, instead of letting it come up to temperature first.
Frequently asked questions about stretching dough
Why shouldn't I flatten the rim when stretching pizza dough?
The rim (cornicione) holds the gas bubbles that built up during fermentation. Flatten it, and that gas escapes — the rim can no longer puff up properly in the oven, and the crust stays flat around the edge instead of turning light and airy.
Can I use a rolling pin to stretch pizza dough?
Generally not recommended for most hand-stretched pizza styles: a rolling pin presses the gas bubbles out of the whole dough evenly, not just at the edge, which leaves you with a denser, less airy crumb. Some styles (very thin, crackery crusts) are deliberately rolled instead of stretched — that's a style choice, not an exception to a fixed rule.
How do I fix a hole in pizza dough?
Lay the dough flat on the work surface at the affected spot, overlap the edges of the hole slightly, and press them gently together. Go easy on that spot for the rest of the stretch and avoid pulling it again.
Why does my dough keep springing back while I stretch it?
Usually a sign the gluten is still tense and hasn't had enough resting time — common right after shaping, or when the dough is too cold. A short pause of a few minutes before trying again usually helps.
Do I need to learn the knuckle technique to stretch pizza dough well?
No. Stretching on a floured work surface with your fingers is just as valid and easier to control for most beginners. The knuckle or hand-tossing techniques are optional variations for more practice, not a requirement for a good pizza.
How big should I stretch the dough?
Big enough to fit safely on your peel, stone, or pan, with a little margin to handle it — not bigger. Better to stop a bit smaller and go further next time than to shape a pizza you can no longer transfer cleanly.
All figures are practical guideline values drawn from common practice and publicly available technique sources (see the source list in the project report), not exact science — dough, flour, and handling vary from case to case. Parts of the text on this page were created with the help of AI tools and reviewed editorially (see the Imprint).