What does shaping (balling) a dough ball actually mean?
Shaping — often called "balling," known in Italian pizza-making as staglio — is the step where the still-shapeless bulk dough is divided into individual, round portions, one per pizza. More happens here than just "rolling dough into a ball": as you pull and fold the outer surface down and toward the centre, you build a taut, closed "skin" on the outside, while the inside of the ball stays looser and gassier.
That outer tension is the real point of the technique. It gives the ball enough structure to hold its shape during the final proof instead of spreading out, and it sets up more even stretching in every direction once you open it later. How this surface tension plays into stretching the dough is closely tied to the topic of dough tension and spring-back — the two articles complement each other.
Why shape dough into balls at all?
- Portioning: a large piece of bulk dough becomes evenly sized pieces, one per pizza.
- Shape stability: the taut outer skin holds the ball together during the final proof instead of it spreading thin.
- Even stretching: a ball with consistent tension all around later opens more evenly in every direction than a piece of dough that was just roughly torn off.
- Gas retention: done properly, the technique doesn't press the gas bubbles built up during fermentation out of the dough — it only redistributes the outer tension.
When do you shape the balls?
There's no universally correct timing for shaping dough balls — it depends on the fermentation schedule you've chosen. The Pizza Coach supports both common approaches:
After the cold retard (recommended for most)
The dough first ferments as one piece in the fridge. Only shortly before the final proof begins is it portioned and shaped. The simpler option for most beginners, since you only have to keep track of one large piece of dough instead of several small ones.
Before the cold retard
The dough is already portioned into individual balls before the cold fermentation, and each ball ferments separately in the fridge. An alternative for more experienced bakers who want more control over the state of each individual ball.
Both paths are built into the calculator and Coach as "balling before" or "after the cold retard" (Coach setting balling strategy) — this article doesn't favour either path, it explains the pure shaping technique itself, which is identical either way. With a direct, fully room-temperature schedule (no fridge step), shaping simply happens shortly before the final proof, as usual.
Preparation
- Work surface: lightly floured or with a thin film of oil — too much flour stops the dough from getting any grip on the surface, which makes it harder to build tension.
- Hands: dry to lightly floured for a good grip; for very sticky dough, slightly damp hands often work better than floured ones (see the troubleshooting section below).
- Have your dough containers ready: a dough box, tray, or individual covered containers, so each finished ball can be covered right away.
- Dough scraper: makes it easier to cleanly separate the portions without pulling or squeezing the rest of the dough unnecessarily.
Portioning
Use a dough scraper to divide the bulk dough into however many pieces your calculator result gives you. A quick, clean cut — rather than pulling or tearing — is easiest on the dough's gas structure.
Weigh each piece if evenly sized pizzas matter to you — small differences of a few grams are harmless in practice, but noticeably uneven ball sizes bake through at different rates and fit differently on a peel or stone later.
For context: the international disciplinare of the Associazione Verace Pizza Napoletana specifies a range of 180–250 g for the classic Neapolitan panetto — that's a style-specific rule for that one tradition, not a universal figure for every pizza style. Your calculator result is based on the pizza size you chose and doesn't need to fall in that range.
Building surface tension
This is the heart of the technique. Two common, equally valid approaches have become standard:
Fold & pull (for softer, stickier doughs)
Lay the piece of dough flat in front of you. Grab the outer edge at several points in turn, pull it up slightly and lay it back down toward the centre — like a series of small folds converging in the middle. After a few passes around the whole piece, the top already looks noticeably smoother and tighter, while a loose knot of gathered ends forms underneath — that will become the seam.
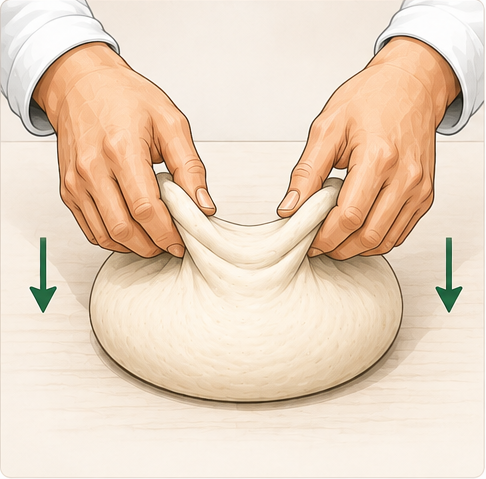
Sealing the seam
Flip the ball over so the gathered ends sit on the bottom. Pinch that spot gently with your fingertips until it's closed. An open seam is the most common reason a dough ball spreads out again during the final proof.
Rounding it off
Cup the side of your hand loosely around the ball and push it in small circular motions across a lightly floured or bare work surface. The friction between dough and surface tightens the outer skin evenly all around, without you having to grab individual spots.
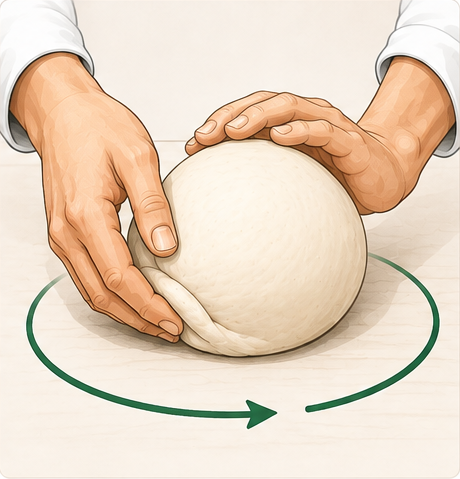
Which method suits better depends heavily on the dough: very soft, high-hydration doughs are often easier to fold than to round (they don't get enough grip on the surface), while firmer, more grippy doughs round off well. Both techniques also combine well — a rough fold first, then a quick round-off pass.
How tight is right?
Neither slack nor rock-hard is the goal. A ball shaped too loosely has little structure and tends to spread out during the final proof. One shaped too tight, on the other hand, springs back more strongly when opened later, because the freshly built tension hasn't had time to relax yet — more on that in Pizza Dough Too Elastic.
As a feel-based test: the surface should feel smooth and under gentle tension, like a taut but not overstretched membrane — similar to a balloon that's full but not overinflated. This sense develops with practice; when starting out, it's usually safer to shape a bit more gently than to overdo the tension.
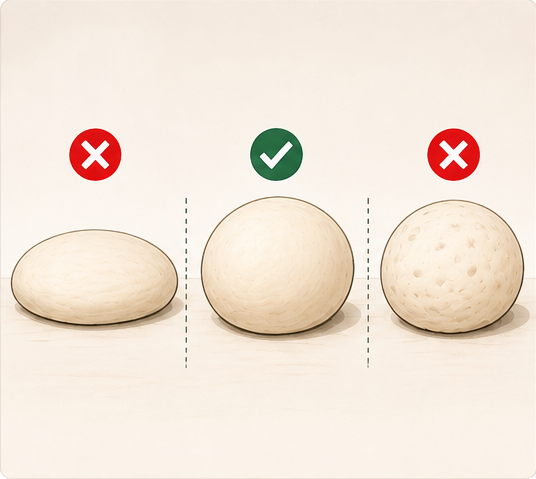
How do you recognise a good dough ball?
- Smooth, closed surface: no visible tears, holes, or rough patches.
- It holds its shape: set on the work surface, it doesn't visibly spread out right away but keeps a recognisably round outline.
- Sealed seam: the underside is pinched shut, not visibly open — a faintly visible seam line is not a problem as long as it's sealed.
- Consistent size compared to the other balls in the same batch: helps give an even bake across several pizzas.
Common mistakes when shaping dough balls
Too little tension — the ball spreads out
- Likely cause
- Too few or too gentle folding/pulling motions, or the seam underneath wasn't properly sealed.
- Likely fix
- After the first pass, do 1–2 more rounds of folding or a quick round-off, until the surface feels noticeably tighter. Pinch the seam again firmly at the end.
Too much tension — the dough springs back hard when stretching
- Likely cause
- A very tightly shaped ball was opened too soon, before the tension built during shaping had a chance to relax during the final proof.
- Likely fix
- Shape a bit more gently next time and give the ball enough rest before opening it. More detail: Pizza Dough Too Elastic.
Sticky dough is hard to shape
- Likely cause
- High hydration, gluten that's not yet well enough developed, or dough that's too warm and soft.
- Likely fix
- Dampen your hands slightly instead of flouring them, and work in shorter, more deliberate movements instead of pulling. Full diagnosis: Pizza Dough Too Sticky?.
Dough tears while shaping
- Likely cause
- Gluten structure not developed enough yet, dough too cold or under-rested, or movements too rough or abrupt.
- Likely fix
- Work more gently and with softer motions. If the gluten simply isn't developed enough yet, check the kneading guide and the windowpane test.
Ball is uneven or oval instead of round
- Likely cause
- Tension wasn't built evenly all the way around, e.g. only pulled at two spots instead of several.
- Likely fix
- Deliberately work all the way around when folding (not just two opposite points), or finish with a quick round-off pass.
Storage and the final proof afterward
Set each finished ball down seam-side down — that keeps the seam closed instead of resting open on the surface, where it could reopen during proofing. Individual, lightly oiled or floured containers with a lid (which stops the surface from drying out) work just as well as a well-floured tray with a loose cover, as long as the balls aren't touching each other and growing together as they rise.
Give a freshly shaped ball a bit of time before you stretch it — exactly how long depends on temperature, flour, and how far fermentation has progressed, and is usually already covered by the final-proof duration in your calculator result. A ball opened right after shaping tends to spring back more than one that's had a chance to relax first.
How this connects to the calculator and Coach
The dough calculator automatically works out the target weight per ball from your chosen pizza count and size. The Pizza Coach then walks you through the entire bake, including its own instructions for the balling step — tailored to whether you're shaping "before" or "after the cold retard." This page doesn't replace that Coach guidance; it goes deeper into the hand technique itself, which the Coach can only describe briefly for space reasons.
Frequently asked questions about shaping dough balls
Should I ball the dough before or after cold fermentation?
Both are legitimate approaches — there's no universally correct timing. Balling after the cold retard is simpler for most beginners, since the dough ferments as one piece and you only portion it shortly before baking. Balling before the cold retard can give more experienced bakers more control over the final proof. The Pizza Coach supports both paths.
How tight should a pizza dough ball be?
Neither slack nor rock-hard. The surface should look smooth and feel under gentle tension, and the ball should hold its round shape on its own without feeling stiff or overstretched. This comes with practice — when in doubt, shape a little more gently rather than too tight.
Why does my dough ball spread out while proofing?
Usually not enough surface tension was built during shaping, or the seam underneath wasn't properly sealed. A dough that's still too soft or under-fermented can also hold its shape less well.
Does the seam on a dough ball need to be completely invisible?
No. What matters is that it's sealed, not open, so the ball holds its shape and doesn't let air escape in the wrong place. A faintly visible seam on the underside is not a problem.
Can I shape a dough ball too tight?
Yes. A very tightly shaped ball springs back more when stretched too soon, because the freshly built tension hasn't had time to relax yet. Giving it a bit of rest after shaping fixes this.
How many folds or pulls does a good dough ball need?
There's no fixed number — what matters is the result (a smooth, taut surface), not the count of movements. As a rough guide, a few deliberate pulls are enough for most doughs; too many repetitions can just overwork it unnecessarily.
All figures are practical guideline values drawn from common practice and publicly available technique sources (see the source list in the project report), not exact science — dough, flour, and handling vary from case to case. Parts of the text on this page were created with the help of AI tools and reviewed editorially (see the Imprint).